Due to popular demand, I have made another diaper bag. When I say popular demand I mean the 30 or so people that have stumbled upon my blog searching for a diaper bag tutorial on google and the several hundred pageviews the tutorial has gotten. Also, the many times I have been pinned on Pinterest. Yes people I am so cool they are pinning my stuff! YES!! I ROCK! I know, it's the simple things ok. Isn't it good that I get excited by this stuff?! Any who, this diaper bag is gorgeous (see other diaper bag
HERE, While you're at it see purse tute
HERE and tote tute
HERE. That didn't sound right, but whatever.) I am really excited by how this bag turned out. prepare to be JEALOUS or not because YOU can make one too :) Tutorial to follow.
She has a bow, piping, pink crystal beads and is monogrammed with the baby's initials. Isn't it lovely!? Would you like to make one? Here is what you need:
One yard of main fabric (I used a light pink quilters fabric)
One yard of accent fabric (I used a grey and white striped seersucker)
Half a yard of fabric for strap (I used a light pink flannel, so its super soft on the shoulder)
Piping get about five yards (you won't use that much, but better safe than sorry)
one yard of fabric for piping (again you won't use that much)
coordinating thread
two crystal buttons
Cut out pieces for outside of purse and lining. The front and back are 17in width by 15 1/2in height. The sides are 6in width by 15 1/2 height. The bottom is 6in width by 17in height.
Now take the front piece of outer fabirc and cut in half. Measure out 18 in piping and a strip of fabric that is 3 in thick. Also, cut out 50in piping for outer edge of purse, with fabric to cover piping with also.
Fold over and use a zipper foot to stitch as close to piping as you can get
Now attach two front pieces (the one you just cut in half) by attaching both pieces to piping. Make sure it is on the wrong side of fabric.
Do the same for the outside perimeter of the purse, leaving the top bare of course.
Cut out a 19in by 16in piece of fabric in you accent fabric. Make a giant bow by cinching in the middle making the width the longest portion (19in). Sew cinch in place on bow.
Now take a strip of same fabric and fold over edges so there aren't raw edges exposed. Wrap around the bows middle. Sew the back part of the strip to hold in place.
Pin to outer portion of front. sew down sides.
Move onto sides. Make a side pocket by cutting a 11 by 8 piece of main fabric. Then a 9 by 4 piece of accent fabric. Fold accent fabric so raw edges aren't exposed and add a trim to the 11 by 8 piece. Sew onlong top and bottom of trim. Now put on side piece you cut out earlier. Sew down the sides FIRST.
For the bottom pleat the fabric by making two small folds on the middle. This will make it a much more roomy pocket. Now sew bottom. Repeat this process for the other side.
Onto the back of the purse. Take a 17in by 9 in piece in both fabrics. now fold them in half a cut an angle off the corner. This is what you should have :
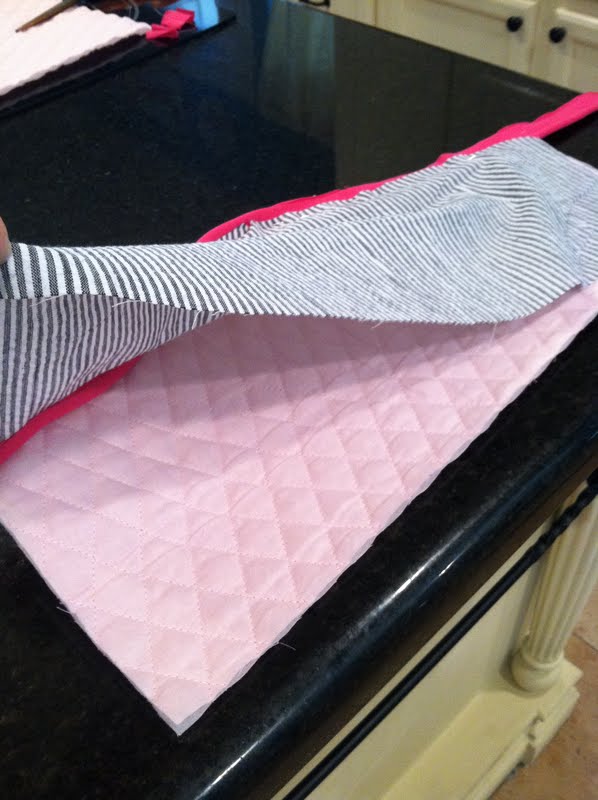
Cut out 19 in of piping and fabric to cover. Make more piping as you did above. Pin in between the top of the fabrics, making sure the outer parts are facing each other (as in it is inside out).
sew along the top and cut the excess piping.
sew along the sides and turn right side out. Press with iron.
Now apply to back piece of purse by sewing the sides and bottom of pocket. Sew a straight stitch down the middle to make two pockets. Make sure to backstitch a lot at the top of the pocket.
now put bag together inside out and sew along the edges of purse
Turn right side out and you have the outer portion of the purse almost finished (minus the straps, buttons, and initials)
Onto the inside of the purse. Cut out two pieces, one in each fabric, for the inside pocket. The size of this pocket is up to you. I like mine pretty big. Babies have lots of stuff to store :) Make pocket by sewing three sides of fabrics inside out. Flip right side and press with iron. Now fold in the third side, I left the bottom open. Sew along this.
Sew to lining by sewing the sides and bottom. Make sure to back stitch A LOT! Think about how much you tka things in and out of bags. Lets prepare for wear and tear. Now I made it into three pockets by stitching two seams down the large pocket. Again, back stitch people!
Now put the lining pieces together and sew along all edges EXCEPT one opening on the bottom.
Fit outer portion right side out in the inside out lining (rightside of bag should be touching the linings pocket. Now sew all along the edges.
Pull bag through the hole that you didn't sitch in the bottom of the lining.
New sew that hole
Push lining in bag and you have yourself a seamless bag! Yay!! Don't get too excited yet, you're not finished.
Hand sew on the buttons in the middle of the side pockets
Now onto the straps. Cut out two 35in by 3 1/2 in strips of fabric. I made a circle on the middle, so its more comfortable where it lays on your shoulder. The circle is 7in wide by 6 in long. Now cut out piping to fit along both edges. You need two pieces of about 40 in of piping. Now cut fabric to fit piping and make more piping as you did above.
Attach both pieces of piping to the strips of fabric with the raw edges facing out. Sew along the sides only!
Now turn right side out and press with iron.
Cut out 4 pieces of fabric for sword shaped ends. Then sew onto the bottoms of strap.
Now take a piece of accent fabric and wrap around to make a trim. Make sure to fold in raw edges. sew along the sides, top and bottom of trim.
Pin to purse making sure it is aligned on both sides and is in the middle of the pocket. Sew along all edges of trim piece and sword shaped piece.
Apply iron on applique according to directions on package and you are finally finished! Yay! Time to celebrate!! Take time to sit back and relish in her beauty :)
I LOVE this! If/when I have a girl, I will be making something very similar for myself. It is also made from all machine washable fabrics, which will be nice for the mom. This precious piece is for my husband's cousin who is expecting in August. So exciting for them! I hope she just loves this bag as much as I do :)
On a side note, does anyone out there know of a good tutorial or website that I can make my own tags for bags and clothes? I would love to be able to put a tag on these sewing porjects I have been doing!
Michelle
Check out where I party


6 comments:
This is such a lovely nappy bag, I'm sure she will love it! Thanks for sharing such a great tutorial.
Cute, cute bag! You are amazing. I love idea of putting a tag in your sewing projects! What a fun way to personalize it even more.
This is wonderful!! So cute :) Here's a tutorial I have bookmarked for making labels with iron transfer paper and ribbon or twill tape: http://patchworkpottery.blogspot.com/2008/09/fabric-labels-tutorial.html You can also search etsy for woven labels if you want someone to make you woven ones instead! Thanks again!
Love this bag. So pretty!
This is cute! No wonder its so popular.
You did a super fabulous job! Lovin' it!
Post a Comment