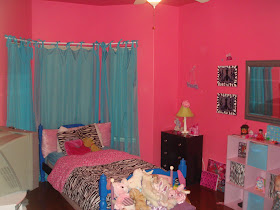
It is amazing what a little paint and some elbow grease can give you in return. This year for Christmas I was excited when my daughter told me that she wanted a new bedroom for her present this year. Sounds expensive....hmmmmm. Also sounds like a present to me as well. I love anything and everything creative. Of course I started right away. This room turned out to be a new world of creativity that I had never embarked on. I learned so many new things in the process. I distressed my first set of furniture and bought all of the furniture used. Either on craigslist, classified ads, or antique malls. The result: A stunning shabby chic bedroom with a funky (pre) teen twist. We also did everything in room, including furniture AND mattress for a bargain!
Her bedroom before:
Her room now:
ahhhhhh so calming compared to the before.
I sewed these pillows and even added a precious eyelet trim. Pretty fancy for a first time sewer!
Well after the pillows, I was feeling pretty confident and decided to do the curtains on my own too. Turned out pretty fancy! (still looking for a vintage vanity stool/bench. Will post when I paint and re-upholster it. Its out there somewhere waiting for me!)
I got inspired by some shabby chic paintings on my google images search and here is what I came out with.
MY very fist job distressing a piece of furniture. Turned out lovely! It was actually pretty easy to do. Just a bit time consuming. distressed the matching mirror as well.
Found this chandelier at Hobby Lobby (one of my favorite places) half off !! I bought a piece of decorative trim for $5.00 and wrapped it around the cord. Voila! Also, notice the close up view of my beautiful curtains.
I made this cute display with some left over material and an open back frame I had laying around. I went to hobby lobby and bought a thick piece of poster board and had them cut it to size. I then bought some pretty white ribbon for the diamonds. A couple shots of the staple gun, (okay maybe a hundred shots of the staple gun) a lot of measuring, and a little hot glue gun for the decorative rhinestones, and here we have it!
This being my first post, everything is kind of jumbled together. In the future a project like this would be step by step in probably ten posts. Oh well! stayed tuned for upcoming projects.


The after is much pettier because it's a softer look. I really like the bedding and the pictures. Looks like a room that both you and she will enjoy for a long time!
ReplyDeleteYou really did an awesome job. I know the love and effort it takes and just how much fun it is to redo a little girl's room. I linked over from the shabby chic cottage. It's a great transformation. I just redid my 10 year old daughter's bedroom. Come check it out if you get a chance www.diybydesign.blogspot.com
ReplyDeleteWhat a very lucky girl to have to bedroom like this! Love all the zebra accents!
ReplyDeleteLove that soft pink! So relaxing!! Thanks for linking up at WhisperWood Cottage!
ReplyDeletethat looks beautiful!!! the soft pink and zebra are awesome!
ReplyDeleteWow, that is just awesome! Every little detail =)
ReplyDeleteGorgeous job on everything. I love that little dressing table; I've wanted one like that for years.
ReplyDeleteHere from Better After ~ You did a great job. And your first post ~ WOW....congrats =)
ReplyDeleteBeautiful! You did an amazing job on everything, she is a lucky girl to have such a fabulous room!!
ReplyDelete